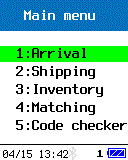
The base functions for each menu can be checked on the main screen.
There are the following types of base functions.
Collect
Editing the app screen
Collection can edit the app screen.
The task begins with inputting item number 1.Once the input for item number 1 is completed, the collection of inputs for item number 2, 3, etc. continues in order.
Editing procedure for app screen
(Startup method)
Standard app editor ⇨ Select [Receiving operations] ⇨ Operations screenOperation example:
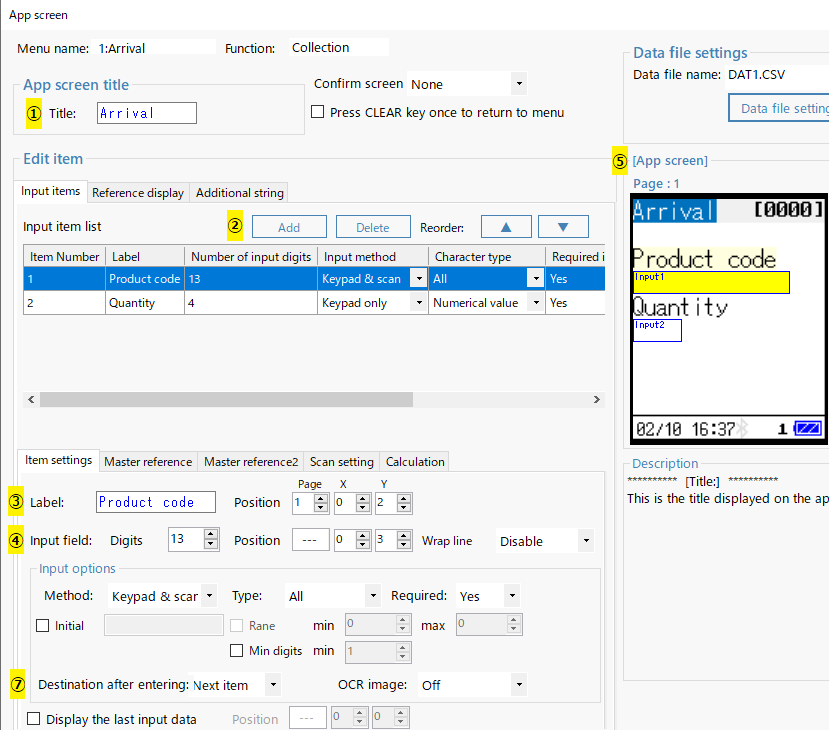
To edit the [Arrival] screen, first add [Arrival] as shown below.
- [Standard app editor] → [New] → [New].
- Enter the app screen title.
- Click [Standard app editor] → [Add Menu:] button to open the [Add Menu] screen.
- Select [Arrival] from the app catalog. [Data file name:] specifies the file name to save [Receiving operations].
- Press the [OK] button to add the menu and close the dialog.
Operation example:
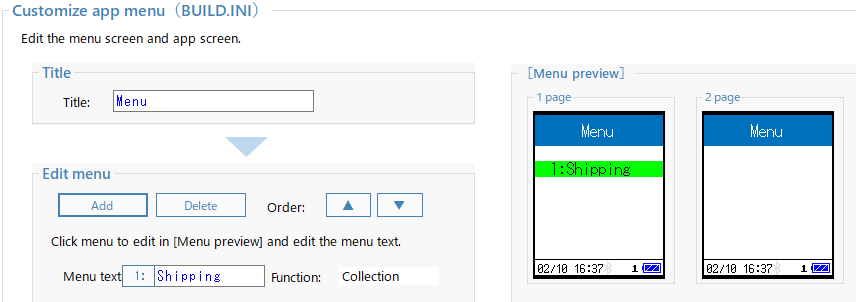
- 1. Edit title:
- Example: Change [Receiving] to [Receiving].
Operation example:

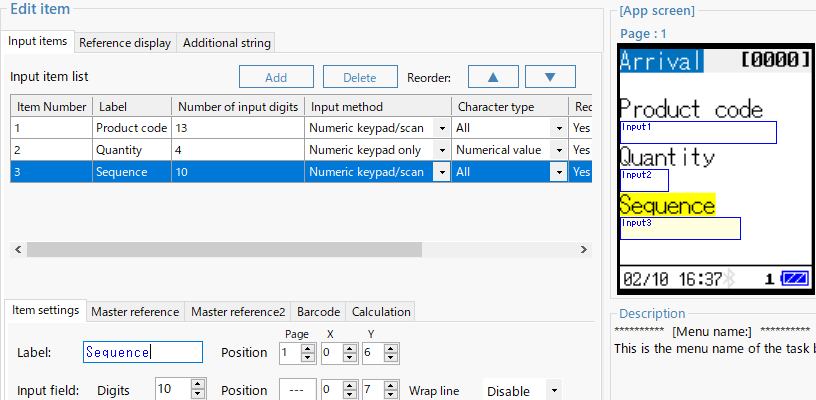
- 2. Add item:
- Click the [Add Item] button to add an item.
Operation example:

- 3.Edit item name: Edit the item name with
- [Item name].
Example: Change [Item name 3] to [Work ID].
You can also edit the default item name [Product Code] and [Quantity].Operation example:
- 4. Customize input:
-
- Number of digits
Specify the maximum number of digits for barcode reading data or key input data. You can specify 0 to 250.
Operation example:

- Wrapping display
Select the number of lines if you want to wrap the input items. The previous input and reference display are also wrapped with the same number of lines.
- Input method
Select an input method.
Numeric keypad only: Specifies input using keys only.
Numeric keypad/scan: Specify barcode reading and key input. The barcode type is added to the file output column.
Scan only: Specifies input by barcode reading only. The barcode type is added to the file output column.
Operation example:

- Type
Restricts the types of characters that can be entered. All (optional): Allow all input (letters/symbols/numbers).
Numbers: Allow only numbers to be entered. Characters containing letters/symbols will not be entered.
When outputting to a file, it will be left justified. (Example of file output when inputting 123 with 5 digits: ,123,)
Numeric value: Only numbers, minus sign "-", and decimal point "." are allowed to be entered. Characters containing other letters/symbols will not be entered.
When outputting a file, pad it with zeros equal to the number of digits. (Example of file output when inputting 123 with 5 digits: ,00123,)
Date: Specify the input date or the number of days from the input date. (File output example: ,20240107,)
Operation example:

- Required input
Specify whether to move to the next item when pressing ENT when the input field is blank.
Yes: If you press ENT when the input field is blank, it will not move to the next item.
None: When you press ENT when the input field is blank, move to the next item.
Operation example:

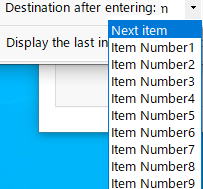
- Where to move after inputting
Specify the item to be executed after input.
Next item: Executes the next numbered item.
Item number 1 to 9: Executes the item with the specified number.
Operation example:
- 5. Screen arrangement by preview
-
You can move the position of the item by dragging it.
Example: Drag and move [Quantity and Input 2].
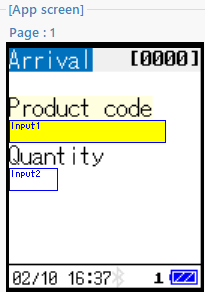 ⇨
⇨
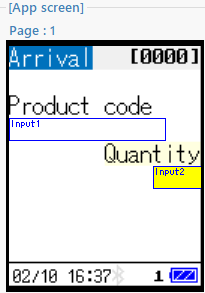
- Repeat steps 6.2 to 5
-
Repeat adding and editing items.
You can add up to 9 items per job. - 7. Specifying the destination after input
- ・Normal
Specify the "move destination after input" for the last input item.
If there is an item that you want to enter only once, specify the item number you want to repeat.
Example: If you want to specify item number 1 "Person in charge" and item number 2 "location" only once at the start of work, specify item number 3.
Explanation of each item
Item settings
- Item name
"Item name" is a character string displayed on the screen. After entering the string, drag the preview screen to adjust the display position.
- Input" specifies
"Input" specifies the position of the input that is displayed during app execution. Drag the preview screen to adjust the display position.
- Wrap display
"Wrap display" specifies the number of lines to wrap and display when the input string does not fit on one line (16 half-width characters).
- Input method
"Input method" specifies input using the numeric keypad or input using barcode scanning.
- Character type
"Character type" limits the characters that can be entered. This item affects file output.
- Required input
"Required input" specifies the behavior when the input field is blank. Specify "Yes" if you do not want to move to the next item with the ENT key when the field is blank, or "No" if you want to move to the next item.
- Display previous input data
If you check "Display previous input data", the input data of the previous record will be displayed. Drag the preview screen to adjust the display position.
- Initial (System ES12.0 or later)
If you check "Initial value", you can set the initial value of the selected item in the adjacent input field. If the input type is a date and you leave the field blank, the date entered will become the default value.
- Range (System ES12.0 or later)
Check "Range" to enable the range of the numeric value of the selected item. Input outside the range will not be confirmed. Cannot be set when the input type is all.
- Min digits (System ES12.0 or later)
Check "Min digits" to enable the minimum number of digits of the numeric value of the selected item. If the number of digits is less than the specified number, the input will not be confirmed. Can only be specified when the input type is number or numeric value.
- OCR Image (System ES12.0 or later)
"OCR Image" specifies whether to display the image during OCR reading.
Off: Does not display the image during OCR reading.
On: Displays the image during OCR reading.
On if error: Displays the image if there is error information during OCR reading.
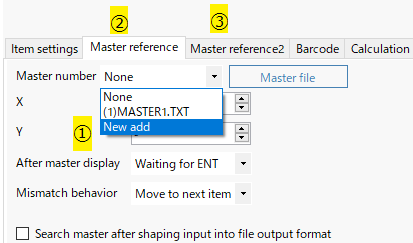
Master reference
-
For more information, see Master Reference.
- Master number
"Master number" specifies the master file to refer to. If you select Create a new file, the master file settings screen will be displayed. If you do not want to use it, select "Not set". If 1 to 6 (file name) is selected, the specified master file will be searched and data with matching key items will be displayed. - Master file settings
Press the "Master file settings" button to display the master file settings screen.
On the master file settings screen, specify the structure of the master file.
Drag the preview screen to adjust the display position.
- Action after displaying the master
"Action after displaying the master" specifies the action after displaying the master.
- Action on mismatch
"Action on mismatch" specifies the action to be taken when the master file is searched and no matching key is found.
Operation example:
Master reference2
Operation example:
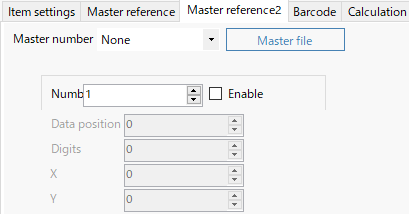
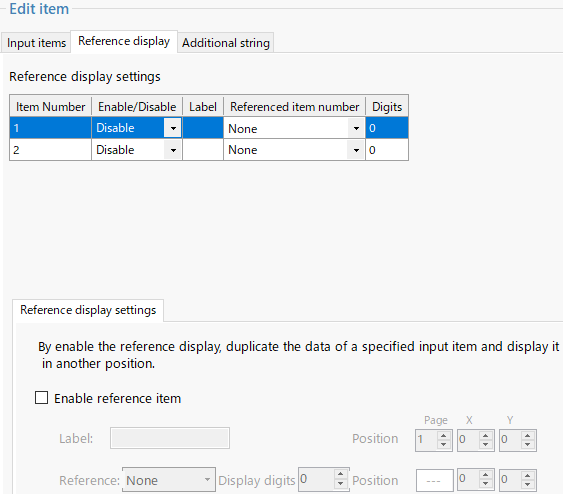
Reference display
You can set the label, reference destination, and number of reference digits.
Operation example:
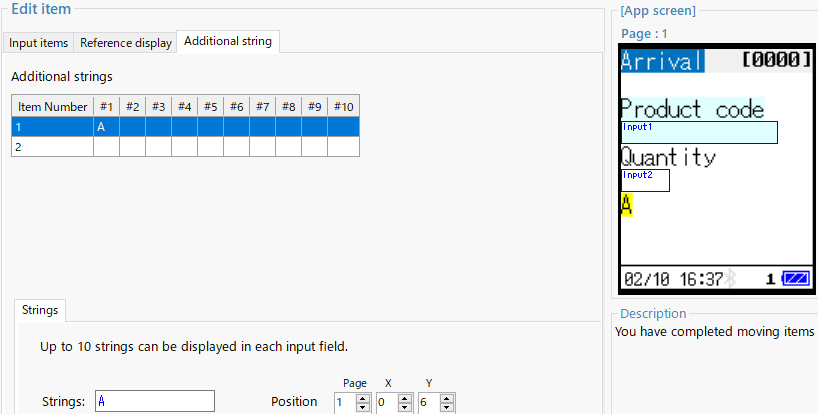
Additional string
Operation example:
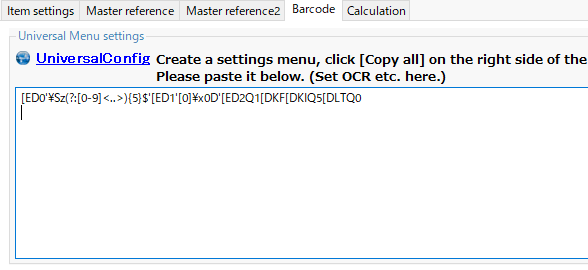
Barcode
Create a settings menu with UniversalConfig and paste the copied command into the text box.
UniversalConfig can be downloaded from the tools on our website.
Operation example:
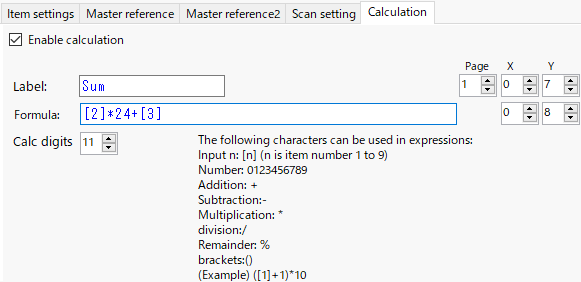
Calculation (System ES12.0 or later)
-
Enables the calculation item for the selected input item. Performs arithmetic operations on the entered or specified numbers. Only integers are supported.
- Label
Specify the label for the calculation item.
- Formula
Specify the formula for the calculation item.
The following characters can be used in the formula.
Input n: [n] (n is item number 1 to 9)
Number: 0123456789
Addition: +
Subtraction: -
Multiplication: *
Division: /
Remainder: %
Parentheses: ()
(Example) ([1]+1)*10
- Number of digits to calculate
Specifies the number of digits to calculate the formula in the calculation item.
Example of operation:
Pick up settings (System ES12.0 and later)
Pick up

How to operate
This section explains how to operate collection (receiving, shipping, inventory).
- Input behavior
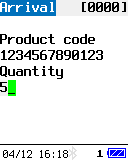
- Enter code⇨△△Enter code⇨Enter quantity⇨Enter code...Repeat.
Continuous input is possible by entering the barcode when entering the quantity.
Press [ENT] key to save the data.
Press [CLEAR] key to move to the main menu without saving the changed data.Input example:
 ⇨
⇨
- Reference mode
-
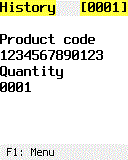
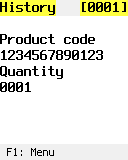
Press [F3] key to switch to reference mode.
In reference mode, switch the displayed data with Q1/Q2. (Q1: old data direction, Q2: new data direction)
In reference mode, press [F1] key to switch to data change mode.
Press the [ENT] key to save the changed data and move to reference mode.
Press [CLEAR] key to move to reference mode without saving the changed data.Input example:
 ⇨
⇨
- If you change and save the data, the read barcode type information will be lost and the data collection date and time will be changed to the data modification date and time.
- Collation does not have a reference mode feature.
(Caution)
Pick up operation method (System ES12.0 or later)
When pick up settings are enabled, you can use the pick up function after receiving an order file.When you select the pick up task from the menu screen, the selection screen "Do you want to use an order file?" will be displayed.
Selection screen
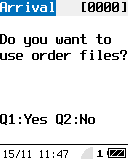
Q1 key: Transition to the pick up screen. Depending on the option, transition to three types of pick up screens.
Q2 key: Transition to the collection screen. (Enter information on the collection screen without switching to the pick up screen.)
Collection screen (when not using an order file)
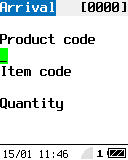
The operation is the same as for normal collection work.
Pick up screen (when using an order code list)
A list of order codes is displayed.Order Code List
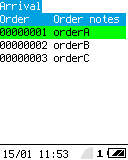
Read a barcode with the SCAN key: If an order code matching the barcode read is found in the list, you will be taken to the item code list for that order code.
Q1 key: Moves the cursor up.
Q2 key: Moves the cursor down.
ENT key: Moves to the item code list for the order code at the cursor position.
CLR key: Moves to the menu screen.
Item Code List
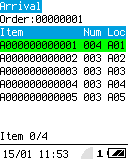
Read a barcode with the SCAN key: If an item code that matches the barcode read is found in the list, the screen will transition to the collection screen (enter item code) for that item code.
Q1 key: Moves the cursor up.
Q2 key: Moves the cursor down.
ENT key: Transitions to the collection screen (enter item code) for the item code at the cursor position.
CLR key: Transitions to the order code list screen.
Collection screen (enter item code)
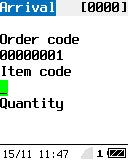
Read barcode with SCAN key: If it matches the barcode selected in the item code list, it will transition to the collection screen (enter quantity).
0-1, * keys: Enter keys.
SHIFT key: Switch between numeric/alphabetical input.
ENT key: If the input matches the barcode selected in the item code list, it will transition to the collection screen (enter quantity).
CLR key: Transition to the item code list screen.
F3 key: Transition to reference mode. The operation method of reference mode is the same as the normal collection screen.
Collection screen (enter quantity)
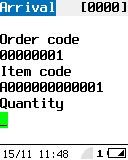
0-1 keys: Enter keys.
ENT key: Confirm the quantity. If the total collected quantity is less than the planned quantity, transition to collection screen (enter item code). If the total collected quantity matches the planned quantity, transition to item list. If the total collected quantity exceeds the planned quantity, a warning screen is displayed.
CLR key: Transition to item code list screen.
F3 key: Transition to reference mode. The operation method of reference mode is the same as the normal collection screen.
Warning screen
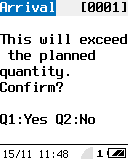
Q1 key: Confirms input, outputs record data to file, and transitions to collection screen (enter item code).
Q2 key: Cancels input, transitions to collection screen (enter quantity).
Pick up screen (when not using order code list)
Displays the input field for order code.Order code input screen
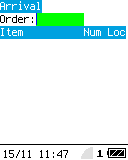
Read a barcode with the SCAN key: If an order code matching the barcode read is found in the list, the item list for that order code will be displayed.
Q1 key: Move the cursor to the left.
Q2 key: Move the cursor to the right.
0-1, * keys: Enter keys.
SHIFT key: Switch between numeric/alphabetical input.
ENT key: If an order code matching the entered string is found, the item list will be displayed.
CLR key: Transition to the menu screen.
Item Code List
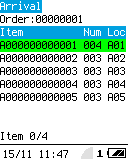
Read a barcode with the SCAN key: If an item code that matches the barcode read is found in the list, the screen will transition to the collection screen (enter item code) for that item code.
Q1 key: Moves the cursor up.
Q2 key: Moves the cursor down.
ENT key: Transitions to the collection screen (enter item code) for the item code at the cursor position.
CLR key: Transitions to the order code entry screen.
Collection screen (enter item code)

Read barcode with SCAN key: If it matches the barcode selected in the item list, it will transition to quantity input.
0-1, * keys: Enter keys.
SHIFT key: Switch between numeric/alphabetical input.
ENT key: If the input matches the barcode selected in the item code list, it will transition to the collection screen (enter quantity).
CLR key: Transition to the item code list screen.
F3 key: Transition to reference mode. The operation method of reference mode is the same as the normal collection screen.
Collection screen (enter quantity)

0-1 keys: Enter keys.
ENT key: Confirm the quantity. If the total collected quantity is less than the planned quantity, transition to collection screen (enter item code). If the total collected quantity matches the planned quantity, transition to item list. If the total collected quantity exceeds the planned quantity, a warning screen is displayed.
CLR key: Transition to item code list screen.
F3 key: Transition to reference mode. The operation method of reference mode is the same as the normal collection screen.
Warning screen

Q1 key: Confirms input, outputs record data to file, and transitions to collection screen (enter item code).
Q2 key: Cancels input, transitions to collection screen (enter quantity).
Pick up screen (when input date in list)
Displays the order code and date input fields.Order code input screen
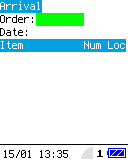
Read a barcode with the SCAN key: If the list contains an order code that matches the barcode read, the screen will transition to the date input screen for that order code.
Q1 key: Moves the cursor to the left.
Q2 key: Moves the cursor to the right.
0-1, * keys: Enter keys.
SHIFT key: Switches between numeric/alphabetical input.
ENT key: If the input string contains an order code that matches the string, the screen will transition to the date input screen.
CLR key: Transitions to the menu screen.
Date input screen
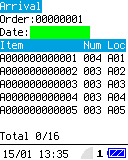
Q1 key: Moves the cursor to the left.
Q2 key: Moves the cursor to the right.
0-1 keys: Enters the date.
ENT key: If the date is correct, transitions to the item code list.
CLR key: Transitions to the order code input screen.
Item Code List
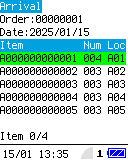
Read a barcode with the SCAN key: If an item code that matches the barcode read is found in the list, the screen will transition to the collection screen (enter item code) for that item code.
Q1 key: Moves the cursor up.
Q2 key: Moves the cursor down.
ENT key: Transitions to the collection screen (enter item code) for the item code at the cursor position.
CLR key: Transitions to the date entry screen.
Collection screen (enter item code)
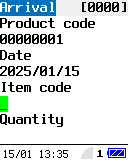
Read barcode with SCAN key: If it matches the barcode selected in the item list, it will transition to the collection screen (enter quantity).
0-1, * keys: Enter keys.
SHIFT key: Switch between numeric/alphabetical input.
ENT key: If the input matches the barcode selected in the item code list, it will transition to the collection screen (enter quantity).
CLR key: Transition to the item code list screen.
F3 key: Transition to reference mode. The operation method of reference mode is the same as the normal collection screen.
Collection screen (enter quantity)
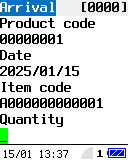
0-1 keys: Enter keys.
ENT key: Confirm the quantity. If the total collected quantity is less than the planned quantity, transition to collection screen (enter item code). If the total collected quantity matches the planned quantity, transition to item list. If the total collected quantity exceeds the planned quantity, a warning screen is displayed.
CLR key: Transition to item code list screen.
F3 key: Transition to reference mode. The operation method of reference mode is the same as the normal collection screen.
Warning screen

Q1 key: Confirms input, outputs record data to file, and transitions to collection screen (enter item code).
Q2 key: Cancels input, transitions to collection screen (enter quantity).
Matching
[Matching] reads two barcodes or two-dimensional codes and checks whether they match.
Editing the screen
Matching can edit screen.
Editing procedure for app screen
(Startup method)
Standard app editor ⇨ [Matching work] selection ⇨ work screenAdd and edit items using the same procedure as for collection.
Matching settings
Press the [Matching Settings...] button to display the matching settings screen. The matching setting screen is used to set the matching position and number of digits for the matching function.Settings are independent for each job (each menu).
Operation example:
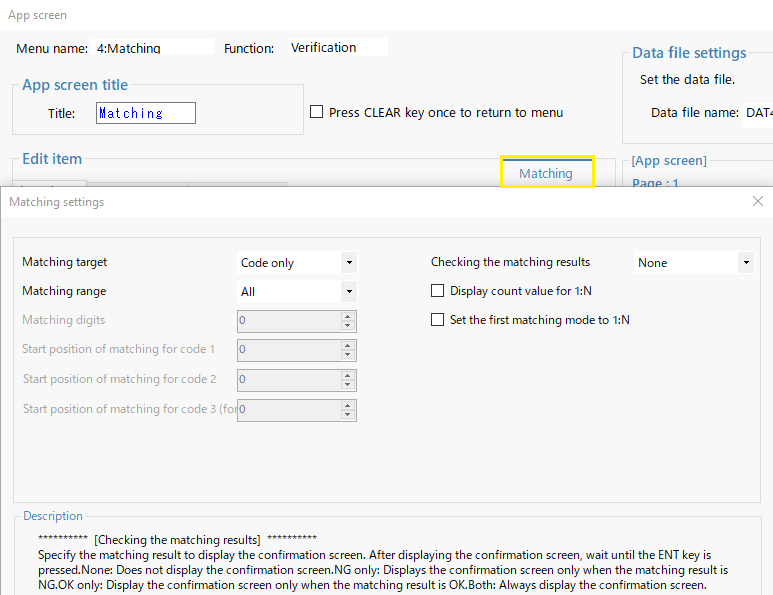
- Matching category:
- Select the matching target from the barcode content and type.
- Code only: Verify that the barcode contents match.
- Code & Code Type: Check that both the barcode content and type match.
- Code type only: Check that the barcode types match.
Operation example:

- Matching range:
- Specify whether to compare the entire barcode or a portion of the barcode.
- All: Compare the entire barcode.
Operation example:

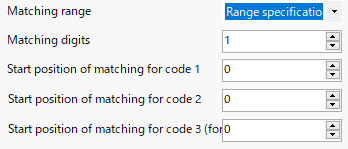
- Range specification: Compare the parts specified by the following items.
Number of digits to compare: Specify the number of digits to compare.
Matching start position for code 1: Specify the matching position of the first barcode to be read.
Matching start position for code 2: Specify the matching position of the second barcode to be read.
Code 3 matching start position (for 3-point matching): Specify the matching position of the third barcode to be read.
Operation example:
- Check matching results:
- After matching, a screen will be displayed to confirm the barcode contents.
- None: Do not display the confirmation screen.
- NG only: Displays the confirmation screen only when the matching result is NG.
- OK only: Displays the confirmation screen only when the matching result is OK.
- Both: Always display the confirmation screen.
Display example:
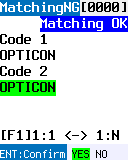
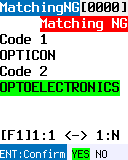
- Display 1:N match count value:
- When performing 1:N matching, the number of 1:N matchings will be displayed under the title at the top left of the screen.
- Check enabled: Displays the 1:N count number during 1:N comparison.
- Check disabled: 1:N count number is not displayed during 1:N comparison.
Display example:
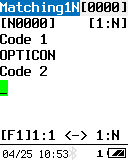
- Set the initial collation mode to 1:N collation:
- After starting the Standard app, the first time the matching task screen with this setting enabled is displayed, the matching mode will be set to 1:N matching.
- Check enabled: Set the first matching mode to 1:N matching.
- Disable check: Set the first matching mode to 1:1 matching.
How to operate
For instructions on how to use [Matching], please refer to [Standard app operations] → [Main Menu] [Matching]/.
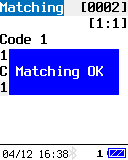 |
 |
|
| If the matching results match | If the matching results do not match |
- Press [F1] key to switch the matching mode. (1:1 and 1:N)
- Matching mode (1:1) compares the read code 1 and code 2.
- Matching mode (1:N) fixes the read code 1 and compares it with code 2.
- You can set the matching range using the matching items in the configuration file.
Code checker work
The code checker service displays the barcode value, type, and length of the scanned code.
For instructions on how to use [Code Checker], please refer to [Standard app operations] → [Main Menu] [Code Checker].
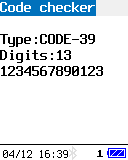 |
| Code checker processing screen |
File sending/receiving
When sending and receiving via Bluetooth or USB, files will be sent, received, deleted, etc. according to the OseComm32 protocol task, regardless of the selected task.
For instructions on how to use [File Send/Receive], please refer to [Standard app operations] → [Main Menu] [File Send/Receive].
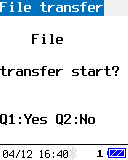 |
| File sending/receiving selection screen |
Delete file
Delete the collected data files.
For instructions on how to use [Delete files], please refer to [Standard app operations] → [Main menu] [Delete files].
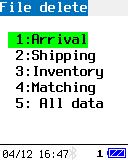 |
| File deletion task selection screen |
FTP sending
Send the collected data via FTP via wireless LAN.
For instructions on how to use [FTP Send], please refer to [Standard app operations] → [Main Menu] [FTP Send].
For error display during FTP transmission, please refer to FTP transmission/reception error code.
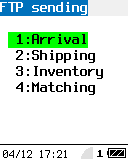 |
| FTP sending job selection screen |
FTP reception
Receive the data file from the FTP server to the Standard app.
It is necessary to set the master file reference in the app setting item.
For instructions on how to operate [FTP reception], please refer to [Standard app operations] → [Main menu] [FTP reception].
For error display during FTP reception, please refer to FTP transmission/reception error code.
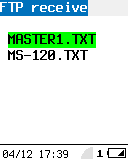 |
| Received file selection screen |
Scanner mode
Scanner mode is a function that reads barcodes and transmits the barcode contents using Bluetooth HID/SPP.
For instructions on how to operate [Scanner mode], please refer to [Standard app operations] → [Main menu] [Scanner mode].
*All scanner mode settings, such as Bluetooth connection settings and barcode reading settings, are independent from the Standard app settings. When using scanner mode, you need to configure the scanner mode settings separately from the standard app settings.
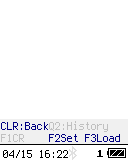 |
| Scanner mode screen |
Power OFF
Turn off the power of OPH-5000i.