(Important)
- OseComm32 utility version 1.0.17 or higher must be installed.
- This Utility is compatible with Windows 7 or later. Other OSs are not supported.
- Communication errors may occur depending on the performance and configuration of your PC. In such a case, please try on another PC.
The OseComm32 utility uses the proprietary OseComm32 protocol to provide the following functionality:
- Send file
- File reception
- Date and time settings
- Get date and time
- Get application version
- Get OS version
- Get file list
- Delete file
The protocol tasks to be executed during a session are specified on the OseComm32 utility side (PC side).
When connecting OPH-5000i with OseComm32 utility, specify one of the following virtual COM ports on the PC side.
- Virtual COM port for Bluetooth incoming (recommended)
- USB virtual COM port
To check the Bluetooth incoming virtual COM port, follow the steps below.
- Select Windows Start Menu ⇒ Settings ⇒ Devices.
- Click the "More Bluetooth options" link to open the Bluetooth settings screen.
- A list of devices will be displayed on the [COM Port] tab, so specify the port with the "incoming" direction as the OseComm32 serial port.
If there is no "incoming" port, press the "Add" button, select "incoming" and press the OK button, and the "incoming" port will be added to the device list.
On the OPH-5000i side, it is necessary to prepare an application program that supports the OseComm32 protocol.
- The standard app built into the OPH-5000i supports the OseComm32 protocol, and can communicate with the OseComm32 utility just by configuring the settings.
Installing OseComm32
If you are using standard app editor
- Click the Bluetooth icon in Standard App Editor.

- Click on the “OseComm32” link.
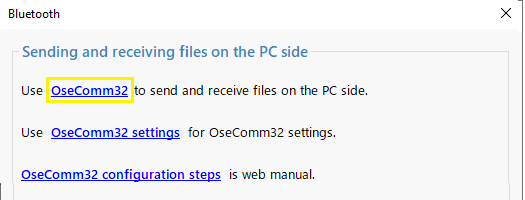
*If OseComm32 has already been installed, the OseComm32 app will start.
- Click Yes.
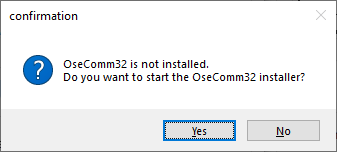
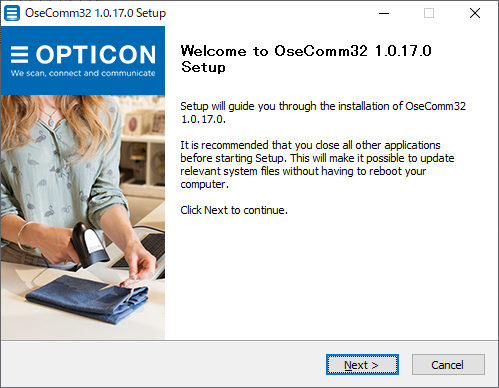
- Click "Yes" on the User Account Control screen.
- Follow the installer messages to install.
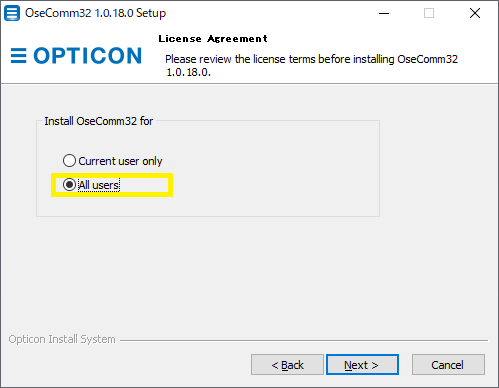
- Select "All users" on the user selection screen ("Install OseComm32 for").
Otherwise
- Click the link below to open the download page.
OPH-5000i | Opticon -> DOWNLOADS -> SOFTWARE -> OseComm - OseComm column and follow the instructions to download.
- Unzip the downloaded file (SetupOseComm32.zip), launch "SetupOseComm32.exe" and follow the guidance to install OseComm32.
- Select "All users" on the user selection screen ("Install OseComm32 for").
- When the installation is completed successfully, the following icon shortcuts will be registered in the Opticon folder in the start menu and on the desktop by default.

Click on OseComm in the


How to operate OseComm32
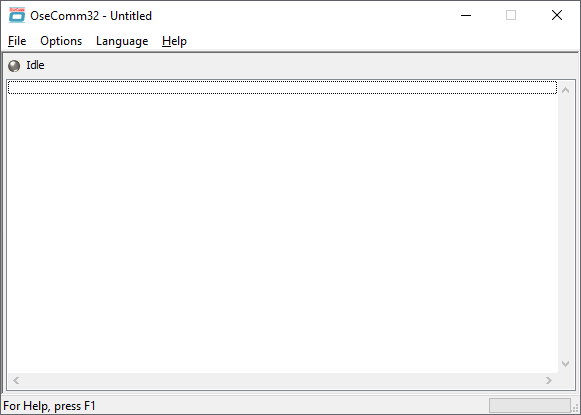
When you start OseComm32, the screen shown below will be displayed.- File menu
-
- Import:
- Export:
- Export settings such as the communication settings described below to a file (extension .osf), and import previously exported files.
- Clear status log:
- Deletes the communication history displayed on the screen.
- End:
- Exit OseComm32.
- Options menu
-
- Protocol start:
- Start the OseComm32 protocol, and once the connection of the terminal is confirmed, run the protocol task according to the settings in [Protocol Task]. I will do it.
- Protocol stop:
- Stop the OseComm32 protocol.
- Initial settings:
- Discards the current settings and returns to the default settings.
- Communication settings:
- Open Communication Options and select Communication Settings or Configure [Protocol Task].
- [Language] menu
- Set the language displayed by the OseComm32 utility. The language you specified during installation will be displayed as a choice.
- [Help] menu
- Displays help and version information for OseComm32.
Communication settings
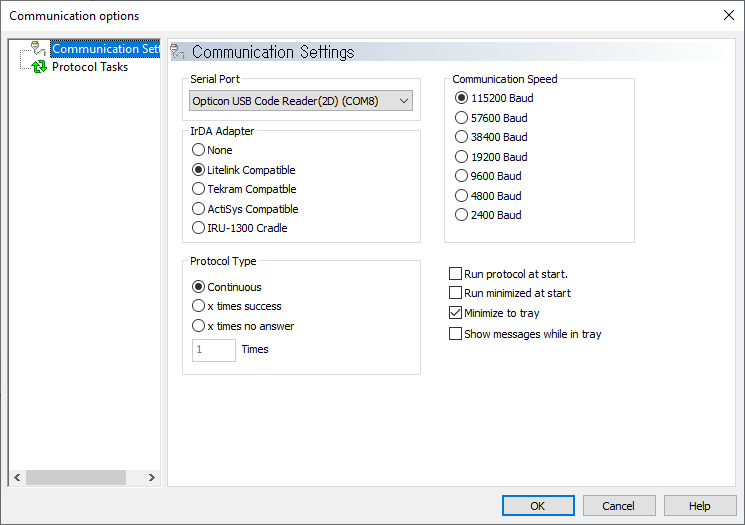
When you select [Communication Settings] in the left pane of [Communication Options], a screen like the one shown below will be displayed.
On this screen, configure settings for connecting to OPH-5000i.
- Serial port:
-
Select the virtual COM port used to connect with OPH-5000i.
All virtual COM ports currently available on the PC are displayed as selection candidates in the pull-down menu. Please note that COM ports in use by other applications will also be displayed.
- Communication speed:
- No settings are required for OPH-5000i.
- IrDA adapter:
- No settings are required for OPH-5000i.
- Protocol type:
-
- Continue (recommended):
- When the session ends, whether it was successful or not, continues the protocol to start a session with the next terminal.
- x successes:
- Stops the protocol after the specified number of successful sessions.
- x times no response:
- Polls the specified number of times and stops the protocol if there is no response.
- [ ] Number of times:
- Enter the number of times.
- Run protocol on start:
- Run the protocol automatically when you start the OseComm32 utility.
- Minimize at start:
- When you start the OseComm32 utility, it will automatically minimize the window.
- Minimize in task tray:
- When the OseComm32 utility window is minimized, it is stored in the task tray.
Protocol Task
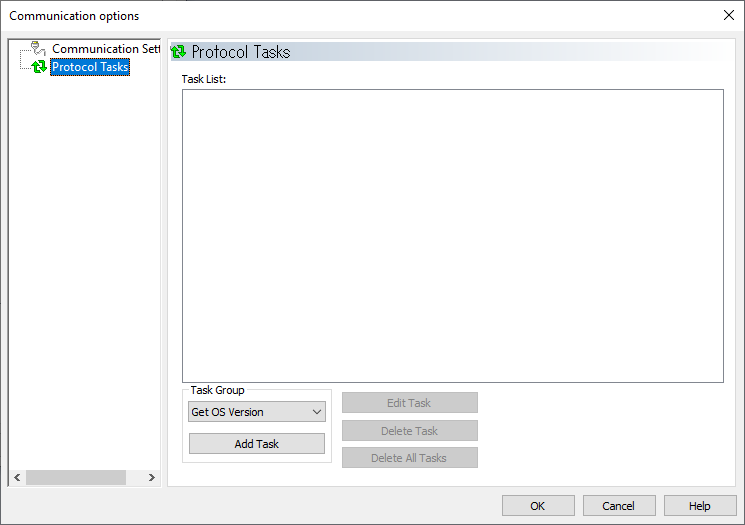
When you select [Protocol Tasks] in the left pane of [Communication Options], a screen like the one shown below will be displayed.
On this screen, register the protocol tasks to be executed in the session.
Registered protocol tasks will be executed in order from the top of the [Task List].
- Task group:
-
Select the type of protocol task from the [pull-down menu] and click [Add task] to add a protocol task. The added protocol task will be registered in the [Task List].
There are the following types of protocol tasks:
- Obtain OS version
- Get the OS version of the connected device.
- Get application version
- Get the version information of the application on the connected device.
- Get date and time
- Get the current date and time of the terminal.
Set the details in [Date and time dialog].
- Date and time settings
- Sends the PC date and time to the terminal and sets the terminal date and time.
- File reception
- Save the file on the connected device to your PC.
Set the details in [Receive file dialog].
- Send file
- Sends files on your PC to the connected device.
Set the details in [Send file dialog].
- List file
- Lists file information (file name, size) on the terminal.
Set the details in [List file].
- Delete file
- Deletes files on the terminal.
Set the details in [Delete file].
- [Edit task]:
- Edit the protocol task selected in the task list.
- [Delete task]:
- Deletes the protocol task selected in the task list.
- [Delete all tasks]:
- Deletes all protocol tasks in the task list.
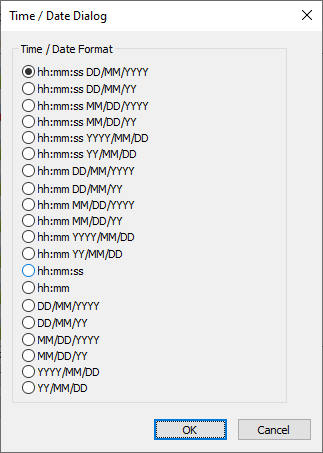
Date and time dialog
Set the details of the protocol task for "Get date and time".
Select the format of date and time information.
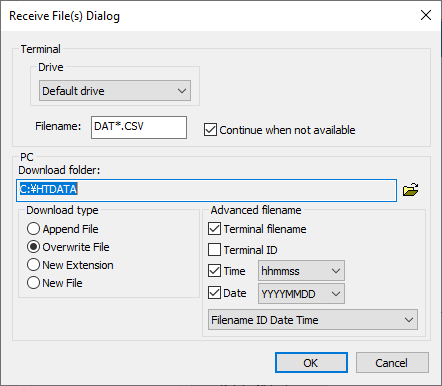
Receive file dialog
Set the details of the "File Reception" protocol task.
- Drive:
- For OPH-5000i, select [Default Drive].
- File name:
- Specify the file name on the terminal to receive. Wildcards are allowed.
- Continue when unavailable:
- Continues subsequent tasks if file reception fails.
- Download folder:
- Specify the folder on the PC side to save the received file.
- Download type:
- If a file with the same name already exists in the folder where you save the received file,
- Additional files:
- Append to an existing file.
- Overwrite file:
- Overwrites an existing file.
- New extensions: Change the
- extension to a value between .000 and .999 and save.
- New file:
- Append numbers up to 9999 to the file name and save.
- Advanced file name:
- Specify the file name on the PC side to save the received file.
If you do not select any item, the file will be saved with the terminal file name.- Terminal file name:
- File name on terminal
- Terminal ID:
- ID number specified in the terminal application
- Time:
- Time the file was received. Specify the format using the pull-down menu on the right.
- Date:
- Date the file was received. Specify the format using the pull-down menu on the right.
- [Pull-down menu]:
- When multiple items are selected, specify the order in which the strings of the items are concatenated in the pull-down menu.
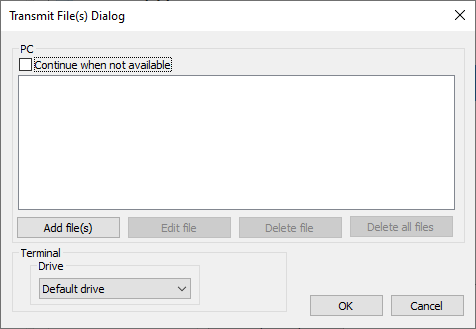
Send file dialog
Set the details of the "File Send" protocol task.
- Continue when unavailable:
- Continues subsequent tasks if file sending fails.
- [Add file]:
- Add the file to send to the list.
- [Edit file]:
- Changes the file selected in the list.
- [Delete file]:
- Deletes the file selected in the list from the list.
- [Delete all files]:
- Deletes all files on the list from the list.
- Drive:
- For OPH-5000i, select [Default Drive].
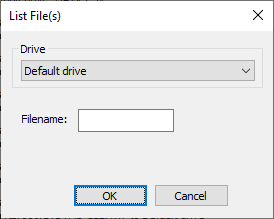
List file
Set the protocol task details for the "list file".
- Drive:
- For OPH-5000i, select [Default Drive].
- File:
- Specify the file name to be listed. Wildcards are allowed.
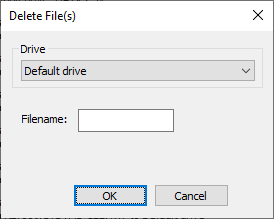
Delete file
Set the details of the "File Delete" protocol task.
- Drive:
- For OPH-5000i, select [Default Drive].
- File:
- Specify the file name to delete. Wildcards are allowed.
Last updated: 2025/01/23
