Important
- When operating the OseComm32 utility with a Bluetooth port, operational troubles may occur due to launching multiple instances. When using the OseComm32 utility with a Bluetooth port, it is recommended that you use this utility to set it to Single instance mode.
- When operating the OseComm32 utility on the Bluetooth port of Windows 10, it has been reported that a communication error occurs in rare cases. When operating with the Bluetooth port of Windows 10, it is recommended to enable the Bluetooth automatic recovery settings of this utility.
- This utility supports Windows 10 (32bit, 64bit). Other OS is not supported.
You can change the behavior of the OseComm32 utility by setting with this utility as follows.
- You can set the OseComm32 utility to single instance mode.
By default, you can open multiple screens of OseComm32 utility, but you can change to a single instance mode in which only one OseComm32 utility is started at the same time by making settings with this utility.
- This utility provides the following functions to automatically recover from problems that occur on the Bluetooth port.
- You can automatically restart the Bluetooth service in Windows 10 before launching the OseComm32 utility to make sure the Bluetooth port is available.
- You can monitor the protocol for abnormalities while running the OseComm32 utility, and if there are any abnormalities, you can automatically restart the OseComm32 utility and the Bluetooth service of Windows 10.
Install OseComm32 settings
Follow the steps below to install the latest version of the OseComm32 settings utility.- Open the Utility updates.
- Click the Latest release column of the OseComm32 settings utility to open the latest update page.
- Follow the install procedure in the page to install the latest version of the OseComm32 settings utility.
Operation of OseComm32 settings
Select "OseComm32 settings" in the "Opticon" folder of the start menu to start the OseComm32 settings utility and open the screen shown below.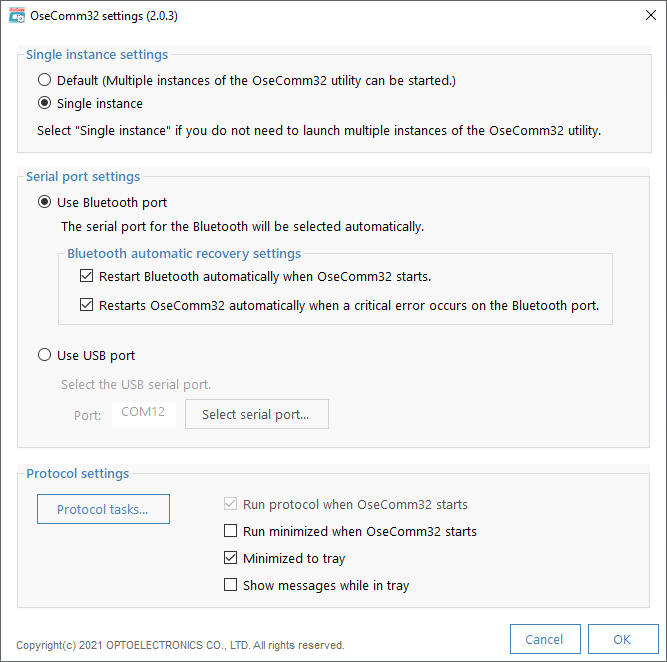
Single instance settings
- Default:
- Performs the default behavior of the OseComm32 utility. If you do not need to launch multiple OseComm32 utilities at the same time, select the following Single instance to prevent erroneous operation.
- Single instance:
- Allows only one OseComm32 utility to start at a time.
The operation when the Single instance is selected is as follows.- If you perform an operation to start the OseComm32 utility while the OseComm32 utility is already running, the screen of the already started OseComm32 utility will be opened.
- If the OseComm32 utility is already running and you try to start it with a configuration file (.osf) that is different from the currently open configuration file, you will see a confirmation message similar to the following:

Click [Yes] to terminate the currently running OseComm32 utility and start a new OseComm32 utility.
Serial port settings
If you select [Bluetooth], you can specify each item of the following "Bluetooth automatic recovery settings".- Use Bluetooth port:
- Select for Bluetooth communication.
- Use USB port:
- Select for USB communication.
- Port:
- Select the serial port used for USB connection with OPH-5000i.
Bluetooth automatic recovery settings
If you select [Single instance], you can specify each item of the following Bluetooth automatic recovery settings.- Restarts Bluetooth automatically when OseComm32 starts:
- If [Run protocol at start] is enabled in the OseComm32 utility and the Bluetooth port is specified as the Serial port,
the screen shown below is displayed when the OseComm32 utility is started and the Bluetooth service is automatically restarted.
And make sure that the specified Bluetooth port is available.

If the specified Bluetooth port is not available, check if other Bluetooth incoming ports are available. If the Bluetooth port is still not available, continue to launch the OseComm32 utility. - Restarts OseComm32 automatically when a critical error occurs on the Bluetooth port:
- While running the protocol on the Bluetooth port, it monitors the protocol for abnormalities and automatically restarts the OseComm32 utility if there are any abnormalities.
At this time, if [Restarts Bluetooth automatically when OseComm32 starts] is enabled, the Bluetooth service will also be restarted.
Limitations
- Do not enable this setting except when "English" or "日本語" is selected from the [Language] menu of the OseComm32 utility.
Protocol settings
Customize the OseComm32 protocol.
- Run protocol when OseComm32 starts:
- The protocol is automatically executed when the OseComm32 utility is started.
- Run minimized when OseComm32 starts:
- Automatically minimizes the window when you start the OseComm32 utility.
- Minimized to tray:
- When the OseComm32 utility window is minimized, it is stored in the task tray.
- Show messages while in try:
- A pop-up message is displayed at the top of the task tray during the communication event of OseComm32.
Save settings
- [Cancel]:
- Discard the setting changes and exit.
- [OK]:
- Save your settings and exit.
Note
- If the OseComm32 utility is running, you cannot change the settings with the OseComm32 settings utility. To change the settings, close the OseComm32 utility and then start the OseComm32 settings utility.
Protocol task
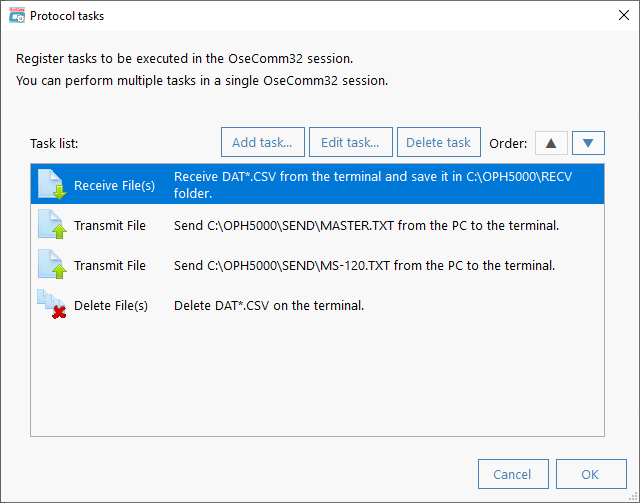
Select [Protocol Task] in the left pane of [Communication Options] to display the screen shown below.
On this screen, register the protocol task to be executed in the session.
The registered protocol tasks are executed in order from the top of the [task list].
- task group:
-
Click Add task to add a protocol task. The added protocol task is registered in the [Task List].
There are the following types of protocol tasks.
- Receive File(s)
- Save the file on the connected terminal to your PC.
Set the details in [Receive File].
- Transmit File
- Sends the file on the PC to the connected terminal.
Set the details in [Send File].
- Delete File(s)
- Delete the file on the terminal.
Set the details in [Delete File].
- Set Date/Time
- Send the date and time of the PC to the terminal and set the date and time of the terminal.
- [Edit task]:
- Edit the protocol task selected in the task list.
- [Delete task]:
- Deletes the protocol task selected in the task list.
- Order: ▲:
- Replaces the selected task with the task one level above.
- Order: ▼:
- Replaces the selected task with the task one step below.
File reception
Set the details of the protocol task of "Receive file".
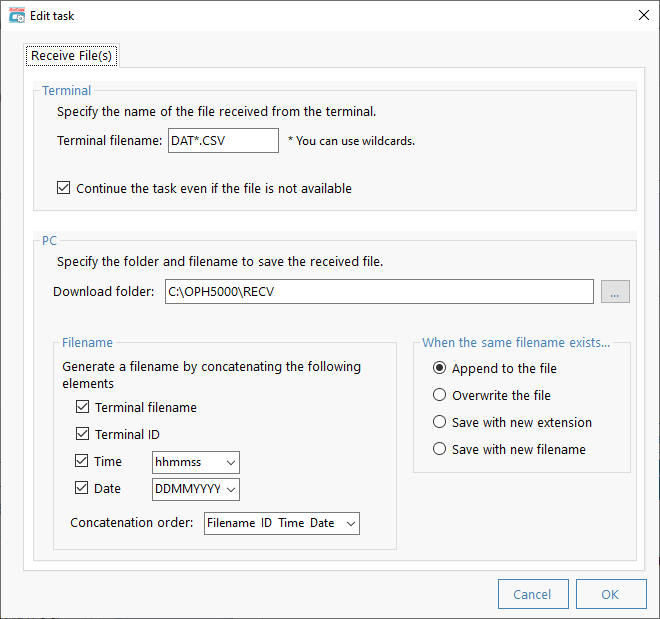
- Terminal filename :
- Specify the file name on the receiving terminal. You can use wildcards.
- Continue task even if the file is not available:
- Continues subsequent tasks if file reception fails.
- Download folder:
- Specify the folder on the PC side to save the received file.
- When there is a file with the same name ...:
- If a file with the same name already exists in the folder where you save the received file,
- Add to the file:
- Append to an existing file.
- Overwrite the file:
- Overwrite an existing file.
- Save with new extension:
- Change the extension to a value between .000 and .999 and save.
- Save with new filename:
- Add numbers up to 9999 to the file name and save.
- Filename:
- Specify the file name on the PC side to save the received file.
If you do not select any of the items, the file will be saved with the terminal file name.- Terminal filename:
- File name on the terminal
- Terminal ID:
- ID number specified by the application on the terminal side
- Time:
- Time when the file was received. Specify the format in the pull-down menu on the right.
- Date:
- The date the file was received. Specify the format in the pull-down menu on the right.
- [Concatenation order:]:
- When multiple items are selected, specify the order in which the character strings of the items are concatenated in the pull-down menu.
File transmission
Set the details of the protocol task of "File transmission".
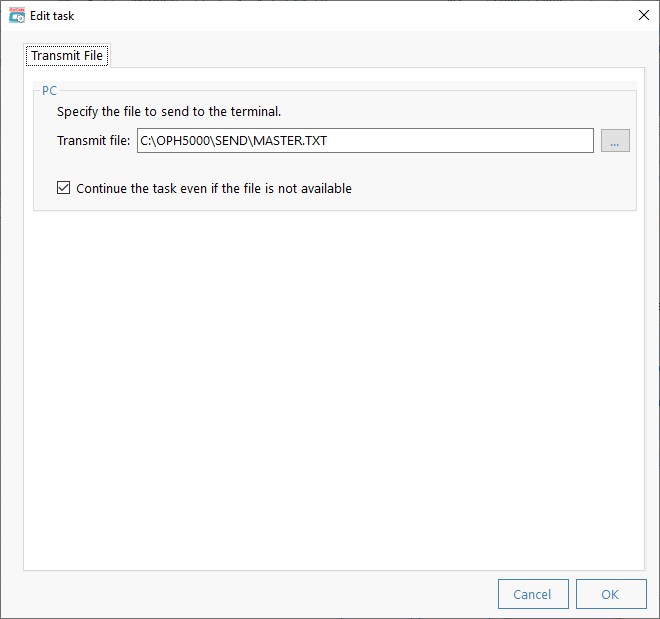
- Transmit file:
- Specify the file to send.
- Continues the task even if the file is not available:
- Continues subsequent tasks if file transmission fails.
Delete file
Set the details of the protocol task of "Delete File".
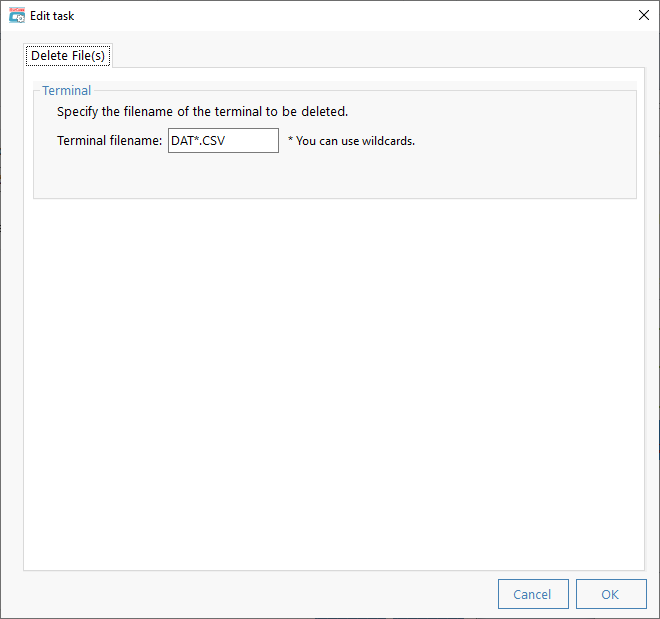
- Terminal filename:
- Specify the file name of the terminal to be deleted. You can use wildcards.
Last updated: 2022/04/20